XPages and Me
My Journey into XPages Development
Diving into Bootstrap and Font Awesome – Part 4: Gone with the Partial Refresh
In Part 5 of my “Dabbling in Bootstrap and Font Awesome” series, I showed you, how you can add tooltips to your fields / buttons by using the attr properties and initializing it with an output script.
If you used this technique, you might have noticed that, after a partial refresh, the tooltips’ Bootstrap rendering is gone. This is due to the fact, that the DOM tree of the partial refresh area gets rebuild and sent back to the browser.
In this post, I am going to show you, what you can do to reinitialize the tooltips after a partial refresh.
For this example I am using a simple XPage. It contains:
- An output script control to initialize any tooltips when the page is first being loaded
- A panel (id “pnlTest”) with a text field inside and a tooltip for the field.
- A button below the panel, that does a partial refresh on it.
The XML markup for this XPage looks like this:
<?xml version="1.0" encoding="UTF-8"?>
<xp:view
	xmlns:xp="http://www.ibm.com/xsp/core">
	<xp:scriptBlock
		id="scrToolTip">
		<xp:this.value><![CDATA[$(document).ready(function(){
	$('[data-toggle=tooltip]').tooltip()
});]]></xp:this.value>
	</xp:scriptBlock>
	<xp:panel
		id="pnlTest">
		<xp:inputText
			id="inputText1">
			<xp:this.attrs>
				<xp:attr
					name="data-toggle"
					value="tooltip">
				</xp:attr>
				<xp:attr
					name="title"
					value="I am a tool tip">
				</xp:attr>
				<xp:attr
					name="data-placement"
					value="bottom">
				</xp:attr>
				<xp:attr
					name="data-container"
					value="body">
				</xp:attr>
			</xp:this.attrs>
		</xp:inputText>
	</xp:panel>
	<xp:button
		value="Label"
		id="button1">
		<xp:eventHandler
			event="onclick"
			submit="true"
			refreshMode="partial"
			refreshId="pnlTest">
		</xp:eventHandler>
	</xp:button>
</xp:view>
If you click on the button, and you hover with your mouse over the field afterwards, you’ll notice that the tooltip lost its Bootstrap styling.
To remedy this, there are two options you can use.
Option 1: Using The “onComplete” Event of the Partial Refresh Event Handler:
In the outline, expand the button and select the Event Handler below it:

Under the “All Properties” tab, scroll down to the section “events” and click on the button beside the “onComplete” event:
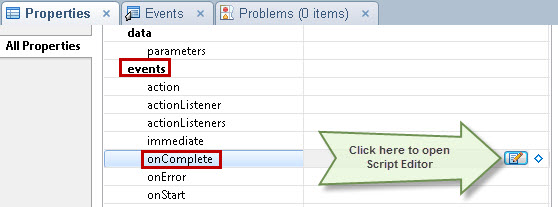
In the script editor prompt, enter the following JavaScript code:
$('[data-toggle=tooltip]').tooltip();
Click on “OK” to close the prompt, save the XPage and give it another try. You’ll see that the Bootstrap styling has been reapplied after the partial refresh.
Option 2: Add Output Script control to the Partial Refresh Target Area

In the script editor prompt, enter the following JavaScript code:
$('[data-toggle=tooltip]').tooltip();
Click on “OK” to close the prompt, save the XPage and give it another try. You’ll see that the Bootstrap styling has been reapplied after the partial refresh.
And there you go. You can use these methods not just for the tooltip, obviously, but for any JQuery function you might be using to manipulate your HTML and would like to have reapplied after a partial refresh.
Here are the XML markups for both solutions:
Option 1:
<?xml version="1.0" encoding="UTF-8"?>
<xp:view
	xmlns:xp="http://www.ibm.com/xsp/core">
	<xp:scriptBlock
		id="scrToolTip">
		<xp:this.value><![CDATA[$(document).ready(function(){
	$('[data-toggle=tooltip]').tooltip()
});]]></xp:this.value>
	</xp:scriptBlock>
	<xp:panel
		id="pnlTest">
		<xp:inputText
			id="inputText1">
			<xp:this.attrs>
				<xp:attr
					name="data-toggle"
					value="tooltip">
				</xp:attr>
				<xp:attr
					name="title"
					value="I am a tool tip">
				</xp:attr>
				<xp:attr
					name="data-placement"
					value="bottom">
				</xp:attr>
				<xp:attr
					name="data-container"
					value="body">
				</xp:attr>
			</xp:this.attrs>
		</xp:inputText>
	</xp:panel>
	<xp:button
		value="Label"
		id="button1">
		<xp:eventHandler
			event="onclick"
			submit="true"
			refreshMode="partial"
			refreshId="pnlTest">
			<xp:this.onComplete><![CDATA[$('[data-toggle=tooltip]').tooltip()]]></xp:this.onComplete>
		</xp:eventHandler>
	</xp:button>
</xp:view>
Option 2:
<?xml version="1.0" encoding="UTF-8"?>
<xp:view
	xmlns:xp="http://www.ibm.com/xsp/core">
	<xp:scriptBlock
		id="scrToolTip">
		<xp:this.value><![CDATA[$(document).ready(function(){
	$('[data-toggle=tooltip]').tooltip()
});]]></xp:this.value>
	</xp:scriptBlock>
	<xp:panel
		id="pnlTest">
		<xp:inputText
			id="inputText1">
			<xp:this.attrs>
				<xp:attr
					name="data-toggle"
					value="tooltip">
				</xp:attr>
				<xp:attr
					name="title"
					value="I am a tool tip">
				</xp:attr>
				<xp:attr
					name="data-placement"
					value="bottom">
				</xp:attr>
				<xp:attr
					name="data-container"
					value="body">
				</xp:attr>
			</xp:this.attrs>
		</xp:inputText>
		<xp:br></xp:br>
		<xp:scriptBlock
			id="scriptBlock1">
			<xp:this.value><![CDATA[$('[data-toggle=tooltip]').tooltip()]]></xp:this.value>
		</xp:scriptBlock>
	</xp:panel>
	<xp:button
		value="Label"
		id="button1">
		<xp:eventHandler
			event="onclick"
			submit="true"
			refreshMode="partial"
			refreshId="pnlTest">
		</xp:eventHandler>
	</xp:button>
</xp:view>

Bravo ¡¡, you make my day
Thanks ¡¡¡
Regards
Glad I was able to help :o)